

LIESEL'S PRACTICAL POUFBUNNY AREA
ADDING LACE TO A PETTICOAT
In this section I give methods that rely on machine sewing. BE CAREFUL! Please follow all instructions and safety precautions given in the manual for your sewing machine. Proceed at Your Own RISK!
~~~~~~~~~~~~~~~~
CHOOSING THE PETTICOAT FOR YOUR PROJECT
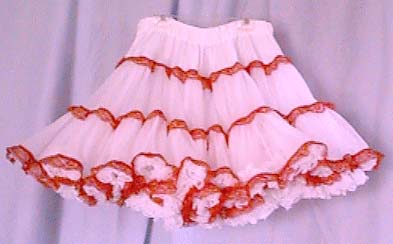
Petticoats that have a plain flat lace in a color that matches the petticoat can be further enhanced by adding a contrasting or complementing color lace not only at the hem, but at each seam between the tiers and at the bottom of the yoke as well. If you add a different color lace over existing lace on a petticoat one thing you can do is add the new lace a little above the existing lace so the existing lace peaks out below the new lace. Another thing you can do with lace at the hem of a petticoat is to use it to make the petti a little longer. In this case, you would want to add the lace to the hem of all of the layers in the petticoat. You can also add lace to a petticoat the has rusching (fluff) and the hem. This will take longer to do than other petticoats because, while adding lace at the hem, you will need to pause sewing every two or three inches to be sure the rusching is clear of your sewing. This works out nice in the end because the rusching poufs up the lace a little. The petticoat I did for this article was a plain white chiffon petti with rusching at the hem (See the "Before" picture below). When decorating a petticoat that has leader line in the hems, be sure to sew the lace at the hem so it is above the leader line. DON'T take a chance on the needle striking the leader line.
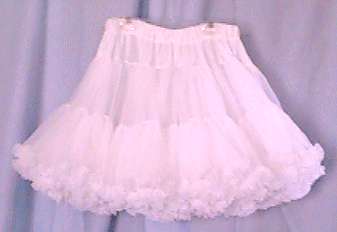 BEFORE
SELECTING LACE
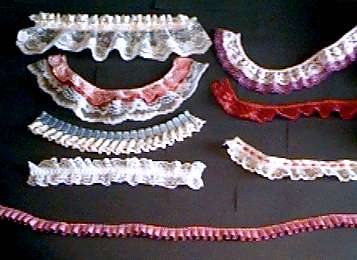
There are some styles and colors of lace and other trims are available in widths of up to 6 inches. Many kinds of trim are available that can be applied in the same way as lace. There a few samples shown in figure 1 (below). The prices of lace vary greatly, so shop around. Also, be aware that many kinds and styles of lace are NOT intended for use on garments. They are for use in crafts. I've never tried using craft lace on a garment; I suspect that it would not wash well and the color may run too. Many times a store will sell both kinds of lace and trim materials and it can be hard to tell which is which. Sometimes I have seen spools that say "Not for use on garments" on the label. Many of the garment trim materials also have washing instructions on the spool label. Generally, the craft materials are less expensive than those intended for garment use. Beware: a bargain trim material may not turn out to be a bargain after you have it on the garment. On the other hand, I've seen some craft trims that were very expensive and not intended for garment use, so price won't always lead in the right direction either. If you can't tell if the lace you want is really for use on garments it's best to ask.
Get enough lace: The petti I decorated for this project took 30 and 1/2 yards of lace. I bought 33 yards. This lace was relatively inexpensive at $.69/yard. I think you'll agree that you don't want to buy a bunch more than you'll need. Running out before the job is done can be bad as well. Lace color varies from batch to batch and if you have to go back for more, the color may not match exactly. Also, some of the most fancy trims may not be readily available if the store has less than you need to finish. Getting the length right is the best bet all the way around (he he he- a small funny). I use a 6 foot (2 yard) cloth measuring tape. Measuring the distance around the yoke seam and the middle seam(s) is pretty easy, because they will usually lay flat. The hem never lays flat so, here's a good way measure the hem: Put a safety pin someplace on the hem -- it doesn't matter where. This pin marks the place where you start measuring along the edge of the hem with a cloth or flexible plastic measuring tape. Start at the pin, and measure along the hem until you are at the end of the tape. Hold that place on the hem while you pull the tape ahead to start measuring again at the place you're holding. Keep repeating the process until you're all the way around the hem, back to the pin. Keep a running total of the length as you go. I had done petti's like this before so I knew the answer was about 30 yards, and I just measured the hem very quickly to be sure this was the same size petti I had done before. The quick hem measurement came out 27 yards, so I just went ahead and bought the same length I bought before (33 yards).
CHOOSING THREAD
In this case, I was adding red lace to a white petticoat. I did NOT want the thread or stitches to be "featured" in the final result. I used white thread in the bobbin so there wouldn't be colored stitches on the inside on the seam. I used red thread that matches the lace for the needle thread so the top stitches would blend in with the lace.
SEWING THE LACE ON THE PETTICOAT
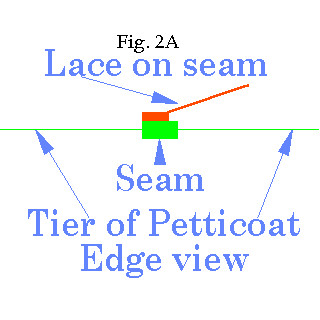
I always start at the back of the petticoat, so the seam where the two ends of the lace join is least visible. To save space, I won't repeat all the basic sewing stuff I covered in the first sewing section. Do NOT precut lengths of lace for each seam you're going to cover. Just put your lace in your lap or on the floor and feed the free end up to the front of your sewing machine. In the case of a nylon chiffon petti, you can sew the lace right on the seam. I have even done this using a small zigzag stitch. This way the lace will help reinforce the seam. Chiffon petticoats tend to come apart at the seams. With organza or net petti's, I recommend sewing the lace slightly above the seam. This way the seam still makes a nice guide to help you keep the lace at the same height all the way around the petticoat. This also avoids having to sew through several layers of tough material. When you're all the way around the seam, back to where you started, sew the lace over the start edge for about 1/4 inch so they overlap a little. Then end your line of sewing as usual. Now cut the lace supply free of the seam you just completed. Be careful not to cut the threads that are holding the lace to the seam. The big secret of success is to go slow. I usually sew no more than 3 inches before I stop and check to be sure everything is going like I want it to. Part of this is working the lace to keep it uncurled so it enters under the presser foot flat and on the seam. It's a good thing we have lots of fingers. You will find yourself using most of them to guide the material, smooth the petti, smooth the lace onto the seam, and keep rusching out of the way. I took about four hours to do the machine sewing for the petti shown below.
FINISHING TOUCHES
As you have started and ended each line of sewing you have left threads dangling. Find them and trim them to about 1/2 inch long. Why? I like 1/2 inch. At each place where the lace overlaps at the start and end of sewing on each seam there are 2 raw edges of the lace that need to be sewn to the lace they overlap (see figure 2).
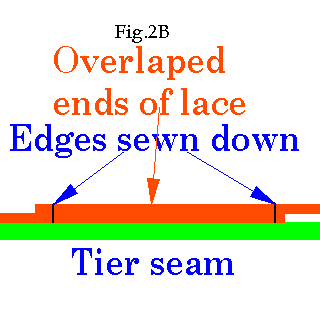
Note that each edge needs to be sewn down right where it lays. Don't try to sew the two raw edges together. The result of such an attempt would be ugly. I do this sewing by hand. Use the color of thread that matches the lace. Start in the seam so the thread knot will have a good hold and sew the raw edge to the lace it is laying on using that cork screw style looping stitch I showed in the section on mending. When you've sewn out to the bottom of the lace sew your way back on the same path using the same stitch. When you reach the seam tie off the thread, and cut the needle thread free. Now sew down the other raw edge that's on the other side of the lace 1/4 inch away. Continue like this until you have sewn down all the raw edges of the lace. This part took about two hours for the petti shown. Well take a look at the "After" picture to see how the petti turned out. Notice how the stiffness of the lace makes the petticoat a little fuller.
 AFTER
AFTER