

LIESEL'S PRACTICAL POUFBUNNY AREA
HAND SEWING (MENDING)
In this section I give methods
that rely on hand sewing. BE CAREFUL! Sewing needles and other
equipment such as scissors and pins are sharp. Cuts and needle
wounds can have serious consequences Proceed at Your Own RISK! If you feel
like you are working too hard and need a break, then chill out and play
foxy bingo or whatever you do to relax.
This is very important
as you do not want to be getting tired and making mistakes.
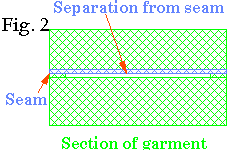
The most common problem I come
across is a seam coming apart. This sort of thing is shown in
figure 2 as it would appear looking down onto an overcast kind of
seam. In this kind of seam
the thread that sews the seam together
also gathers the edges of material in the seam into a bundle.
Overcast seams are common in petticoats and other lingerie.
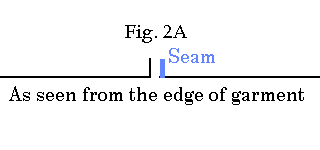
Figure 2A is looking at the opening in the seam from the edge. The seam is on the right side. The cloth that tore away from the seam is shown on the left. The torn edge is turned up a little ready to be sewn back to the seam. Be careful not to overlap the torn cloth onto the seam to much, as pulling the cloth back into the seam shortens the garment. If you use just a little to rejoin the seam it probably wont be noticeable. If you pull a lot of cloth into the seam as you sew it back you may be able to see the garment is shorter in the place under where you sewed the seam back together. Also as you sew the cloth back to the seam start sewing on the seam just a short distance before the tear in the seam. As you're finishing the sewing, sew a short distance beyond the end of the tear. This will help keep the seam from coming apart again starting from one end of the tear.
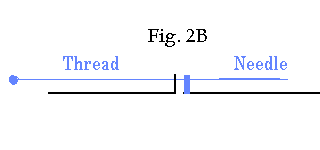
Figure 2B shows starting to sew the seam back together using a plain hand sewing needle and thread. The dot at the end of the thread is the Knot you tie in the free ends of the thread after the thread is passed through the eye of the needle. When the thread is threaded through the needle and knotted at the end the double thread should be about three times as long as the tear. I'd rather have a little thread left over than run out before I'm done. If the tear is very long, working with thread three time as long would be to hard. In this case use a length of thread you feel comfortable working with. Sew as far as it will take you, tie the thread off, and start over with more thread. This way you can treat a long tear like several short ones in a row. I've never used a sewing machine to do this because I don't think this machine can do overcastting, or at least I don't know how to do it.
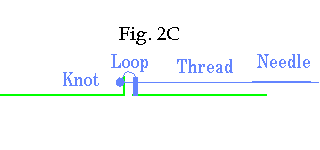
Figure 2C shows how to sew the overcast. After you have passed the needle through the torn edge and the seam pull the thread through until the knot is against the cloth. Then pull the thread back across the edge of the seam and sew another stitch from the same direction you started the first stitch. This will result in a loop of thread over the edge of the seam. Keep doing this putting your stitches in at about 10 or 12 stitches to the inch of seam you're sewing.

Figure 2D shows how the seam will look along its length. Note how the thread loops over the edge of the seam for each stitch. The thread slants a little since each stitch is down the seam a little from the last one. As you sew the stitches be careful not to pull the stitches to tight or leave them to loose. I try to keep my sewing so the seam is only slightly larger than the original. The slightly larger is because of the new layer of cloth that's being added to the seam.
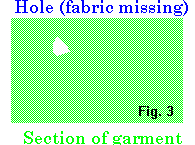
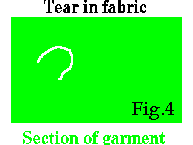
Figures 3 and 4 show a tear in the fabric of a garment. In the first case the material is completely gone and in the other the material is still present. In the case where material is still present reattach the loose piece to the main part of the cloth by sewing loops between the edges as shown in Figure 4A (below). Do this only at places where the edges meet and keep your sewing close to the edges so you don't gather a lot of material into the sewing. If you gather to much material into the sewing you will make a wrinkle in the cloth. Remember to tie off the thread at the end of your sewing to secure the thread. Now you're at a point where you treat either the Figure 3 or 4 case the same way from here on. A patch needs to be applied. Yes, a patch is needed even in the case of Figure 4. The sewing you just did has little strength and will tear again easily. You can patch the tear with a piece of material like that in the garment. This will probably mean a trip to the store and finding something that matches exactly will be hard. Even after all that effort of finding the material and carefully sewing on the patch it will still LOOK like a patch. I found an alternative that looks much better and even gives you a chance to make you garment special. Most sewing and craft stores sell appliques. These are pieces of cloth cut to a specific shape like a heart, poodle, angle, etc, etc. These are usually made fancy with embroidery, felt, lace, or ribbon. Find one you like that's big enough to cover the problem area on your garment. Position the applique over the tear and pin it in place with straight pins. Thread up a needle and start sewing from the bottom side of the garment. Place the needle up through the garment's cloth through the applique near the edge of the applique. Pull the thread through until the knot in the thread is at the back of the cloth. Then place the needle down through the GARMENT CLOTH ONLY right beside the edge of the applique. Now move down the edge of the applique slightly and sew back up through the garment AND the applique. Sound familiar? Overcast your way around the edge of the applique. You're done! Not only did you fix the tear, but you've made the garment special too!
|